New Gardener Checklist
Gardening at Rose Tree Garden can be challenging for both beginners and experienced gardeners alike. The goal of this guide is to point out common issues and tell you about workarounds before they get out of hand. It is geared towards new gardeners, but those who have been at Rose Tree Garden for years may benefit from some of these tips.
Prepare Your plot: Eliminate weeds
Weeds are a substantial issue at the gardens. Poor management over the years has led to weed issues becoming a major problem for most gardeners. The checklist below will substantially reduce the issues if not eliminate them completely. All steps must be followed for success to be guaranteed. The entire process will take 2 to 3 weeks, so start early enough to not delay planting.
For more information visit the Weed Prevention page.
Clean and Level your plot
When moving into a new plot, you will notice the parks department has rolled the soil over, burying vegetative material below the surface. These are plants (and plant matter) that were left from the previous tenant. While these will be fine to leave in place, it is advisable to clean up all this material and move it to the perimeter of your plot, or move it to the garbage cans for disposal. Not removing this material will result in living plant matter re-rooting and causing a problem in the future.
Once you have cleaned up the plot, take a rake and level it out to the best of your ability. The hoeing process the park performed leaves many large ruts that need to be removed. In the process of leveling you will likely find additional bits of debris that needs to be removed. While your plot doesn’t have to be perfectly smooth, getting it reasonably smooth will make the following steps easier.
Water and Hoe
While many know tilling can help destroy plant matter living in the soil, most don’t know it can contribute to a severe weed problem later in the season. This is because by moving the soil around, you uncover hidden annual weed seeds that could have been buried since last year (or potentially many years). The following process, called creating a stale seedbed, is designed to eliminate these new weeds.
After cleaning and leveling, thoroughly water your plot. If using a sprinkler, let it SLOWLY deposit water on your plot over the course of an hour. If hand watering, evenly spray for ~10 minutes, take a break for an hour, and spray for another 10 minutes. Be sure to not water so much that soil runoff occurs. Leave your plot and come back 1 week later.
After waiting 1 week, return to your plot and begin the process of removing weeds. This is not done by hand but with a tool called a stirrup hoe. These can be picked up at your local gardening store. This is one of the most valuable garden tools you could purchase. It works by cutting the stems of weed seedlings at the soil line, killing them in the process. You will never have to bend over and weed again! Watch videos online on how to use the hoe and be sure to sharpen the blade with a metal file! Dull blades do not cut weeds. IT IS CRITICAL TO SHARPEN YOUR HOE!
Wait 1 week and go back to your garden for another round of hoeing. After this second round of hoeing your weed numbers will be greatly reduced. About once or twice a week, quickly walk through your plot and hoe any new weeds that come up through the summer. No weed fabric needed. Easy!
Checklist
Items
- Stirrup Hoe
- Deer Fence (6’x100′)
- Small Animal Fence
- Fence Posts
- Garden Plants
Tasks
Weed Control
- Thoroughly clean and level your garden plot. Dispose of any dead and living plant material
- No large root/plant debris should be visible
- Level your plot using a rake
- Water thoroughly
- After 1 week, hoe all new growth
- After another week, hoe all new growth again
- You are ready to plant!
Assemble The Garden Fence
- Install your corner posts
- Install the rest of the fence posts
- Attach short metal fencing to the posts
- Add deer fence to the posts 1 foot above the ground
- Ensure all gaps are sealed and fence is properly attached to posts
Purchase and Organize Plants
- Decide how you will arrange the plants in your plot and what you will grow
- Purchase healthy plants at your local garden center
- Install your plants how its recommended on the plants page
Install your Fence: Prevent Animals
It is common knowledge among members at Rose Tree Garden, the deer and other mammals can be a huge problem. You could do everything correctly and have wonderful looking fruit on your plants only to show up one day to pick them and find out they have been consumed by a deer. The following information will tell you the best way to protect against them without spending a huge sum of money.
For more information, visit the Fence Design page.
Purchase your Fencing Material
There are numerous fencing options available to you, but we are going to focus on two main goals: ease of assembly and lower cost. These two goals will be met while preventing deer with a 7′ tall fence and small mammals. Before purchasing any fencing material, you will want to talk to your neighbors. If all of your neighbors have fences, you might only need enough material to cover the remaining side.
Main Fence: Many gardeners opt for a metallic fence, but these can be heavy, difficult to install, and not tall enough to prevent deer from jumping over. A better option is a deer fence which is made of nylon, comes in various heights and is easy to install. We recommend Tenax as they make quality fencing material and are based in the US. You should be able to find a 6’x100′ fence for less than $90.
Small Mammal Fence: One downside to a nylon fence is that small mammals are able to chew through it. The use of small metal fences prevent this from happening. The easiest type of small mammal fence to find is metal poultry netting. The only downside is that it can be difficult to work with, especially after a couple seasons of use. 100 feet of 2ft tall poultry netting can be purchased for less than $40.
Fence Posts: Fence posts are critical to ensuring your fence is able to remain standing all season long. There are two main options for posts: T-post and U-post. T-posts should be used on the corners of the plot as they are the strongest. If you want a lighter but weaker post, the U-posts can be used for the rest of the fence. 7′ tall T-posts can be purchased for $7 each and 5′ tall U-posts for $5.50. You will need between 14 and 18 posts.
Assemble your Fence
Begin the installation of your fence by driving the corner T-posts into the ground. Fence post drivers help with this but it’s possible to get your posts into the ground using just body weight and a hammer. USE HEARING PROTECTION as the hammering will cause hearing damage. Keep hammering the posts into the ground until they are 1′ deep or about when the post flange goes underground. The next step is to evenly space the remaining fence posts. Running a string between the corner posts can help ensure the fence lines are straight. If using fence posts that are shorter than 6′ above the ground, you will want to attach 1″ x 1″ strips of wood to the posts using either zip ties or screws.
Once your posts are in the ground, install the metal fencing by attaching it to the posts with a zip tie or cloth ties. You will want to make sure the bottom of the fence is partially buried to prevent animals from digging under the fence.
The final step is to install your main fence. Unroll it and zip tie the top of it to the posts as you work your way around the plot. After you have finished unrolling the fence, go back around to each post and secure the fence with ties as needed.
If you ever need assistance, don’t hesitate to ask your neighbors. Everyone knows how difficult it can be to install a fence, especially for the first time, so most will be more than happy to help.
Begin Gardening: Install your Plants
Weeds are a substantial issue at the gardens. Poor management over the years has led to weed issues becoming a major problem for most gardeners. The checklist below will substantially reduce the issues if not eliminate them completely. All steps must be followed for success to be guaranteed. The entire process will take 2 to 3 weeks, so start early enough to not delay planting.
Plan your Garden Layout
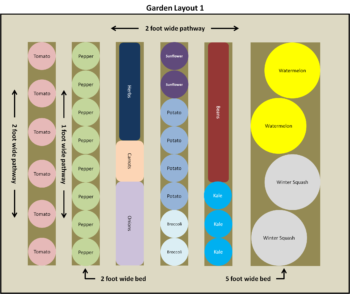
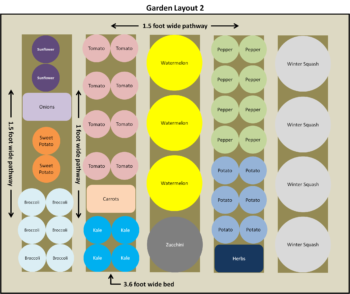
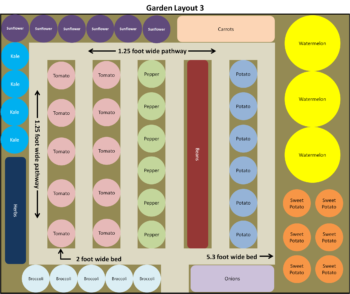
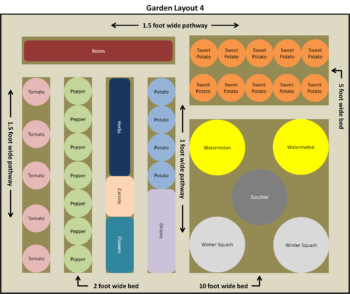
Garden planning is an important step that many people don’t consider when setting up a garden. Knowing which plants grow well next to each other, won’t shade their neighbors, and all mature around the same time help you manage your plot throughout the season. We will go over the primary points to consider when planning your garden. Use the images to the right as references.
Organization: One of the best ways to maintain a well-organized garden is to arrange your plants in rows. Besides looking nice, it serves as a great way to access produce, allow for easy inspection of pests and disease, and ease the burden of weed management. For new gardeners, single plant rows (as shown in Garden Layout 1) are recommended.
Within the rows, placing similar plants next to each other makes pest management and succession planting much easier. Many people like to evenly distribute their plants with the belief that companion planting will improve growth. Except for specific instances, companion planting doesn’t improve growth and should be avoided for new gardeners.
Shade: If you are planning on growing a diverse array of plants, it is likely you will have issues later in the season where some of your more vigorous growers begin to shade or overtake their neighbors. Knowing which plants could potentially shade others will help keep your entire garden healthy. Plants that are vigorous growers include but are not limited to tomatoes, sunflowers, pole beans, and winter squash.
Use the garden map as a guide to where your taller plants should go. Taller plants should be planted on the northern side of your plot while smaller plants should stay in the front.
Purchase your Plants
Shopping for plants can be one of the more exciting parts of gardening. Even though we strongly recommend you shop at one of our local garden centers, the tips for picking healthy plants are universal.
- Stocky and vigorous growth
- No actively growing fruit (flowers are ok)
- Good root growth where they are visible just under the top soil surface and/or through the drain holes
- No signs of disease or insect damage on the plant
- Plants that are ready to go into the ground (ask a garden center employee if unsure)
If you have questions about plant selections that are more specific to the kind you’re wanting to grow, visit the Plants page for more information.
Plant and Water Your Plants


